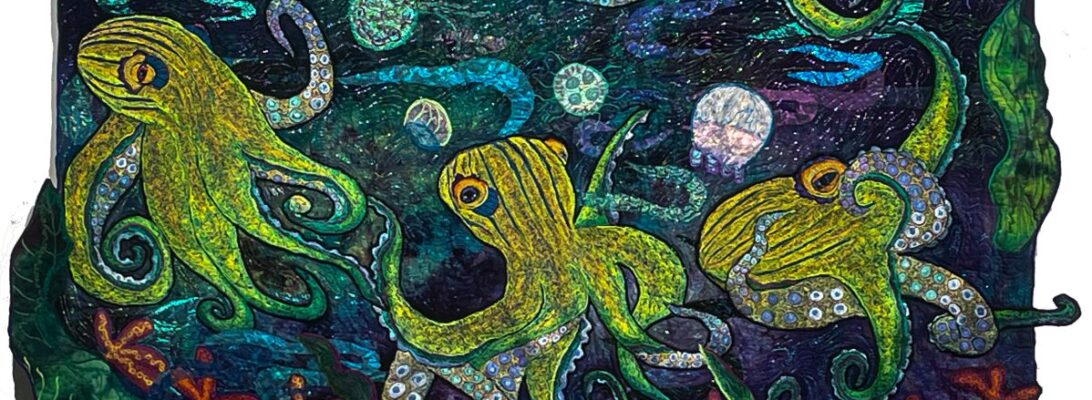
If you’ve been following my posts, you’ll know I’ve been on a quest to clarify my process. It started with my process photos. I found I’m quite rigid with how I create work. It always feels like play. But the structure has to be the same, because the steps build on each other.
Pin-ups are a dress rehearsal. Mostly I use component quilting as my work model. I start each quilt with a central image. Then I add embroidered components around that image until it makes sense. At some point, I have a pile of embroidered bits and the background. That’s when I do a pin-up.
Why four? That isn’t rigid. As the pieces develop, you need a dress rehearsal to figure out how they work together. Whenever I’m not sure of the next step, I do a pin-up. Some pieces, I can pin them up and I know. Some take endless pin-up sessions. I place my components into the quilt on my design wall and stare at them for a while.
This one has taken four pin-ups so far.
What have I learned?
The octopus must be on an angle to work.
Yellow fish are too bright. The orange fish work better.
This is a dramatic background but it really doesn’t have a light source. I could build one but it’s busy enough already.
Too pink tentacles are too much.
Angle better than straight
Orange fish better than yellow
Overwhelming pink tentacles.
I wouldn’t know if I hadn’t tried it all in the pin-up.
I also fixed the tentacles so they’re better in place.
My best studio tool is the design wall. My most important process is to pin things up and really look. Because if I get it wrong and I stitch it down, I have the choice of it never being right or ripping for days.
Every hummingbird deserves a fine buffet lunch, so this one has a flower of her own. The flower is made from different pink lace sheers, cut into petal shapes and backed with Steam-A-Seam 2.
I love using sheers as flower petals. Petals are, by their nature, translucent. But the sheers need extra support. I use a piece of felt in a color that I won’t mind seeing afterwards.Steam-a-Seam 2 is an excellent glue, but it also stiffens the piece. I also have a piece of Stitch and Tear behind it all.
Steam-a-Seam 2 is a fusible glue sheet backed between 2 pieces of paper. You peel off one side, place your fabric on the glue, and it will stick of its own accord. Then you cut out your shapes. It leaves you with pieces much like color forms. You peel off the other piece of paper and you can place your pieces as you like.
When you’re happy with your placement, you can iron down your pieces. You’ll want a Teflon pressing cloth, because the glue will seep through your piece. Iron thoroughly on a medium-high Steam setting. You can clean the pressing cloth with a ScotchBrite Blue Scrubby for non stick surfaces.
All of that leaves you ready to stitch. I’m working with a zigzag stitch. Each petal needs to be outlined and detailed, but it really doesn’t matter in what order. So I can change the areas by petal so that I’m using different threads from my thread range across the flower.
Why go to the trouble of making the flower into an applique? Because after all that stitching, it’s going to pucker up and want a kiss. Cut off all those stabilizers, and you’ll have a flat and lovely flower for your quilt.
Want to see this completed? You’ll find the whole project on my Patreon Page.
I have a commission that I want to share with you.
I don’t do these often because commissions are hard. Commissions demand a lot of communication that sometimes doesn’t work as well as it should. It’s hard to talk about something that is strictly visual.
But this is for a friend. And it’s a small piece. We’ve talked through what she wants. It’s a 7×10-inch ruby-throated hummingbird with a flower. I’m pretty confident it will be what this lady desires.
Because it’s a small piece, I’ve decided to do a series of articles and videos about making it. It covers different skills and processes. For you, it’s a look behind the scene to see how quilts are made. For my owner, she has full documentation. You can all watch step by step how this quilt is created.
She wanted a red-throated hummingbird.
It all starts with a drawing. I draw out sometimes just my subject. Because this is a commission I drew out a number of birds so my owner could choose. These drawings are on Totally Stable, which is an iron on, removable stabilizer that has a good drawing surface. I use it for all my patterns.
This is the bird she chose. I need that bird flying left to right. But because the pattern goes into the back side, the face side will be left to right.
I also need to zone my pattern. She has a green body, grayish wings, and a red throat. Zoning reminds me what threads to use in the top of my machine. Each zone will have several colors within that range that go on the bobbin side. Since we’re upside down, that’s where they’ll show.
What’s next? Stitching in. And figuring out how to make the video program work better. Next week
Want to see this completed? You’ll find the whole project on my Patreon Page.
Octopuses have put me in the land of the garnet stitch. It creates. textire and pattern, all within it’self.
Garnet stitch is one of the great non-programmed stitches. it’s simply moving your hands free motion in circles. Check out the Variable Garnet Stitch for more information about the stitch.
Garnet stitch has another very useful feature. You can always see the background behind it. Sometimes that is to be avoided. I pick my embroidery background to match the overall background carefully, so only the stitching stands out.
But sometimes I want the embroidery background to shine through.
This was one of those times. The background for this piece is darker and moodier than the other pieces in the series. I needed something to lighten it up. So I used a very odd cream and green background. I love it. I have a green and cream light octopus in a dark sea.
We are on to the pin up stage for octopus 4. That’s always the moment of truth. You know if it’s going to work at that point.
Because I’ve made small metallic fish and 2 nurse sharks, I have my components to fill the space and set a path. I’ll tweek it some, but the design is pretty much there.
There’s a lot of stitching left, and I need to do my water layer. But I’m confident I’m going to like this piece.
Just to show you where I am in the octopuses garden, here’s the pieces so far.
One more at least to go. Does it look like a show yet?
I never used to think about how a quilt would be viewed. Was it pretty? Did it move? Did it tell a story? Did it change people to see it? I never thought about how the size of the space around it affects what the viewer sees.
Now I’m keenly aware of the space a quilt will hang in. I don’t have any control over that when I sell a quilt. It goes where the owner wishes. It becomes part of their house and their lives.
But small work is viewed differently, just by definition. Small work is made to be examined. You come up close to see it. Every detail matters and is exposed.
Unfortunately, most small work isn’t really that visible at a distance. It’s made to be intimate. Your relationship with it is within its small space. It fills a tiny space with an explosion of color and detail.
Larger works have a harder task. Done well, they will pull you from across the room. The movement and the color should sweep you in. But once you’re up close, the detail should amaze you.
When I first started using rubbed fabric in pieces, they were all experiments. I worked very small, partially to learn and partially to see how they would be received. I was limited by the size of the rubbing plates. The largest were under a square foot.
I’ve worked hard to find alternatives since then. I’ve used ceiling tiles and texturized surfaces. I’ve learned to make my own rubbing plates from modeling paste using stencils. So my options have expanded not only in size but in possibilities.
With these octopus quilts, I’m using the rubbings as objects themselves, rather than backdrops. Mostly, I did seashells and jellyfish.
I love the rubbings I’ve done for this. But they need something to pump them up to be seen across the room.
I usually use straight stitch #40 poly thread to match and shade the rubbings. That’s exquisite on a small piece. It’s almost invisible at a distance. So how do we pump it up?
I chose to stitch my jellyfish in white. I rarely use white. It’s too bossy. But for this piece, white thread pumps the jellyfish up.
I chose to outline with a very small zigzag. It’s a subtle difference. But it does define the line.
For the seashells, I did not outline. Their shapes were visible enough.
The downside of this much stitching is that I have some distortion. We can fix that. Where’s my iron?
We got hit with an unexpected and awful tax bill. So all my quilts are on sale.
New, old, large, tiny quilts all available at the best prices.
I don’t ever want to ask for money. Instead, I offer you my very best work at my very best price. If you’ve wanted a quilt of mine, this is the time. I’m also open to offers.
Once I find something that works, I tend to stick to it. A creature of habit, like anyone else. What pushes me out of the box? Mistakes! Misorder! An inability to find what I need! Basically, it takes a catastrophe. Fortunately, it doesn’t have to be a big catastrophe for it to do the job.
I really love using rocks in my work. They weigh a piece. They can form a visual line. They add a dark shadow or highlights depending on your color choices that frames the piece. They identify the bottom of a piece.
972 Shelter from the Storm unstitched rocks
I’ve used hand-dye for years for rocks. It already has that mottled texture and color. I used to soft edge the appliqué so the edges weren’t as obvious, but I’ve come to like the shading I can do with black thread. Inner shading works better with a straight stitch. Outside edge works best with a thin zigzag top, and a heavier shaded bottom.
texturized rocks
I sat down and started cutting rocks for the Octopus surround and realized, I didn’t have enough rock fabric. I dye greys and browns specifically for rocks, But there is almost never enough. And greys and browns are regular backing colors I use all the time. But if you’re working on three quilts at once, that’s a lot of rocks.
They also need to be differing colors. Rocks are never all the same. That’s part of their charm. They need to fit well enough to be identified as rocks, but they need a separate individuality to work.
Earlier this year, I ordered a box of cheesecloth. I use dyed cheesecloth for leaves, flowers, and other translucent things. I bought a box of cheesecloth at Joann’s every year or so. That cheesecloth was a uniform open weave,
Now that Joann’s is gone, I found that cheesecloth is graded in sizes by the number of threads per inch. Makes sense. It’s how we class thread and fabric.
I overestimated and ended up with a much tighter weave of cheesecloth. At first, I thought it wasn’t a problem. Then I realized it was much less transparent and much more like regular cotton.
I’d dyed a batch that sat on my table for a long time. It lacked the same transparent grid of the lighter-weight cheesecloth, and didn’t do the texture of leaves as well.
When I went to clear the table, there it was, in about a dozen browns and greys.
So if I use cheesecloth for rocks, what changes? I have to choose a background that will show through. The weave will show through as a grid of sorts, but that can be pulled in different directions and stretched.
Normally, I stitch my rocks on black felt, because it gives me an edge that fits with the stitching. If it’s all backed in felt, it should work.
Interestingly enough, what changes is how the stitching looks. Straight stitching sinks into the texture of the cheesecloth and is less visible. But the cheesecloth makes it more textured.
I’m not sold on cheesecloth for rocks, but I think it works here. I can always stitch heavier.
Last week has been spent in fish production. I can’t really put in the octopuses until I have the fish to create the path around them.
Usually, fish have scales, and the scales divide the space..You progress from scale to scale, picking lighter colors as you get to the underbelly. You fill in the scales darker on top and progressing through lighter colors around the belly. It’s pretty. It gives depth.
What if you don’t divide the space? You can stitch row after row of color next to each other. It looks stripy. There’s a place for that, but it’s not very natural.
It doesn’t work for clown fish.They blend from one color through another without separation.
So how do you fill in a larger space? One way is the short and long stitch.
You need to understand that none of this is a stitch on your machine. It’s all zigzag stitching. The change is the angle in which your fabric goes through the machine.
The long and short stitch is done from side to side. The difference that it spreads from both sides and fills in unevenly, shading the area softly and without stripes. The top and bottom of the image has a solid line to outline.
That kind of shading allows us to put in darker contrast colors to shade that blend right in. These fish are shaded with a dark and then a lighter purple. Since the colors are mostly covered with orange thread, your eye blends them into a shaded solid orange.
All of this is for the octopus’s garden. This is my second pin-up. I think it needs one pillar rock and some water, but it’s ready to back, and stitch.
The octopuses’ garden series is working up. I finished up with the MAP kids, got enough rest to face the studio, and discovered that we had to find it to face it. Prep for a class leaves endless clutter and many nice neat piles sprawled everywhere.
It will be a while before we find the table. Then we can search for the floor.
But in that process I’ve started the next step for the octopuses.
Why do I need all those fish? The octopuses are all well and good, but they’re not going to be dynamic without something building a path. So we are making fish. The fish are what will make the octopus quilts move.
I mean a lot of fish. Ive got somewhat close to 50 fish drawn for four quilts. Will I use them all? Maybe.
This is about fabric scarcity. A year ago, we could get almost any fabric. This December, I had to beg a dye house for my order of pdf cotton. They had 50 yards in-house that they were portioning out to their clients.
I hate that. I hate depression economics and carefully crafted source shutdowns. I hate the idea of saving rubber bands and string. We’re there. All of a sudden, hand-dye is precious, and I need to be careful to use up the little bits.
Today I went through felt, hand-dye, and stabilizer scraps. It was a good thing I was cleaning up and sorting. There are some scraps I keep good account of. Anything brown, gray or stony ends up as rocks in another quilt.
But here I was scrounging for backgrounds for fish. Normally, I dye fabric especially for the larger embroideries. This last year, normal has fled out the windows.
I’m not going to talk about why. It’s incomprehensible anyway. Why was Joann’s so reckless as to go defunct? I suspect greed and stupidity dancing arm in arm off to court. Joanns is gone. Our place to run out for everything sewing is gone.
Walmart used to have a decent fabric section. Now it has an isle of highly unappealing cuts made from mostly poly blends. I’m deeply underwhelmed. I suppose you could use it for Halloween costumes.
Thank God there are quilt shops. But so much is catch as catch can on the internet. Do you need needles? Sheers? Felt? Not always at the quilt shop.
So all of a sudden, all of my hand-dye is limited. And precious. And I’m digging scraps out of piles to embroider on.
If I sound like I’m whining, I am. I hate scrapping for fabric. I’ve spent the day digging through fabric scraps, trying to make it work out. I’m not open to discussion about this. This is just how I feel.
The real question is, do I really want to do my art? No matter what?
I don’t understand making an arranged shortage of anything. I don’t get it. It’s stupid with a funny hat on it.
But I’m dammed if I won’t do what I can with what I have.
So, how do we find the fabric that is out there? I’m not sure.
This is a brave new world I don’t like very much. Women don’t count. Art doesn’t count. Sewing doesn’t count to the point where it’s not even treated as an industry anymore. Everything plastic glitters golden.
When the quilt world started, men really didn’t notice. It was something women did for each other. Men considered it pin money. Quilt shops flourished from the early 70s to the 80s before men inserted themselves into the industry in a “professional” way. Things changed. Fabric was a big business. They waded in and took over. Now they drop it like a stone.
So if it’s not an industry anymore, what do we do now? We need to figure it out. And since the male fabric industry has no interest in our needs, we need to figure it out together. We’ve always known how to find fabric for each other.
We need to support any fabric store we can. If we need them to be here for us, we have to be here for them now.
We need to find new ways to find fabric.
And I’m finding scraps to embroider fish on, because it’s what my pieces need.