One More Time: We Need Another Fish

Fall Waters the original quilt

Late last year I did a fish quilt that I thought was really successful. As an experiment, I took some of the same elements to see if I could make something that matched it in energy and beauty. Not copying. Just trying for the same feel. It failed. It laughed in my face.

This is not a new thing. I have piles like an archaeologist’s dig of pieces that didn’t work, tucked into the corner or another. And I raid those piles regularly, looking for the next thing.

Here is my failed experiment. I found it tucked in one of those piles. Could it work a different way?

first fish for fish rising

I blame the fish. He’s a nice fish. A little clueless. But not compelling.

New catfish

So we/re trying again. Same background. New fish. Something with more drama going on.

At that point, I abandoned the idea of using the same components. This quilt needs its its own water and world. I put in sun motes across the surface. I decided against small embroidered fish because I already had some wonderful ones rubbed into the fabric in gold.

Fish Rising, with a different fish

Once I added the new fish, I felt more assured. Full disclosure, I cut off the white tail ends since they made it look like Pac-Man. Much improved.

We’re not done yet. Lots of layers of stitching and sheers left to go. But it doesn’t feel like a loser anymore. My experiment was very useful. You really can’t step into the same piece of art twice.

Building An Ocean Floor: Seashells and Pebbles

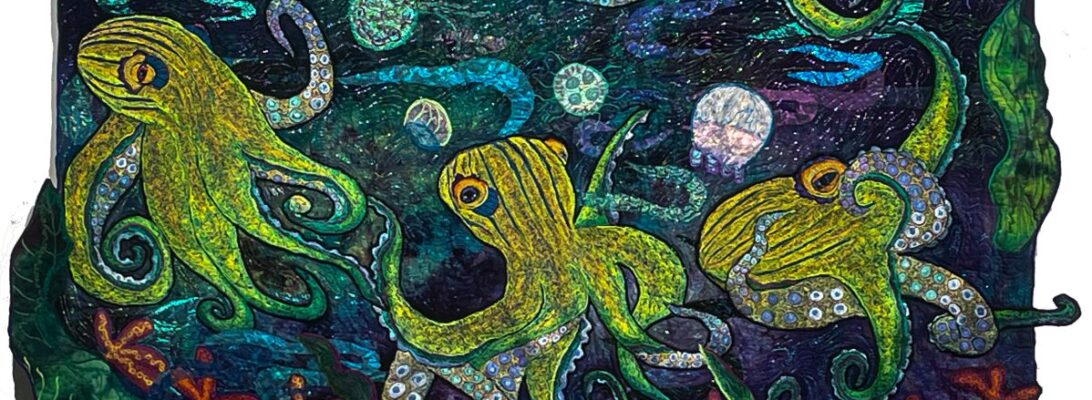
I’ve been working for some time on my octopuses, and I’ve begun to build up backgrounds. I’m working on three of them simultaneously. It’s complicated. But if I work one piece at a time, changes in construction creep in. It’s almost unconscious. I may have worked the water a different way, or the rocks are different, and won’t fit in. This way, I’ll have three pieces that flow into eachother seamlessly.

This week I worked on seashells and jellyfish. I’ve been collecting stencils ( there are no commercial seashell rubbing plates I know of) to make rubbing plates. I used foam board for a base, and modeling paste to make rubbing plates of the stencils. You’ll find full instructions for this in Modeling Paste: All it Needs Is Peppermint Flavor

I used this rock backsplash I got from Lowes to make the pebbles.

This is one of the backgrounds I chose for the octopuses. I’m still not sure about Octopus 1. I’m tending towards the green-blue background. I wanted seashells and pebbles on the sea floor, and jellyfish floating above. I found I couldn’t place them correctly all at once. I put in the shells, then the jellyfish and finally the pebbles.

It’s a work in process. I’m waiting for them to dry to get the next photos and then we’ll add what’s needed. I think today will be cloudy with a chance of fish drawings.

Planning a Surround: Family Planning for Octopuses

I’ve been noodling around the idea of a series planned as a surround. I’ve done many series over the years, but this is different.

I suppose you could plan a series. But I’ve never seen it happen. You do one quilt with a subject that is either so fun or compulsive that you do another five more. That’s an organic process that I enjoy. But it doesn’t lend itself to consistency.

These birds just happened. I love the shape of them, the bills and that crazy pink coloration. So I’ve made a number of roseated spoonbills.

We’re talking something different here. A surround has to be planned so that each piece flows into the other one. I can do that somewhat with the drawings. They need to flow across the different quilts into eachother. I can do that somewhat with background images. Rocks and seashells can make a pathway. I can also do that with small fish. I’m thinking of clownfish and something small and gold in color. That is the plan.

The coloration should be easy. The hand-dye needs to be all of the same intensity, and we’ll keep the octopuses bright. They should fitin with each other well.

The first octopus is embroidered and ready to place in background elements.

The second octopus is almost embroidered. I need to outline the suckers.

He’s already had a large change. Originally, I had one sucker tentacle closer to the head. It worked in the drawing but not in execution. So I cut it out, and moved it. I think it works better.

shell rubbings from another project

The next steps will be tricky. I plan to rub seashells into the fabric on the bottoms of all of these. They’ll need to fit into eachother. I’m not sure if I can display them all on one photo wall. But they need to dance across four pieces altogether. The last time I did something this large, I hung it off the back porch of my apartment building and walked down the alley to where I could see it as a whole. That was three homes ago. We’ll need to figure it out.

I’ll keep you posted as I work on this. I think it’s going to be a wild ride.

2025: A Year of Experimentation

I didn’t have any shows this year. Which is ok. Every artist has ideas they aren’t quite sure how to approach. Instead, I spent a lot of time trying out ideas I wanted t do my quilts. That takes time and effort. It messes with production significantly. So I’m glad to have spent my studio time this last year in this way.

I learned how to make waterfalls.

I learned how to make a reflection of my subject in water.

I worked on seashells and tenacles.

I experimented with extreme borders.

I learned to make my own rubbing plates from stencils.

I learned to incorporate those plates into my work.

I worked in desert landscapes.

I finally worked out the cat head fountain.

It’s been a good year for learning. If you’ve followed my blog, you know, because each week I show you what I’m working out, working on, and working through.

Here’s to 2025:

Major quilts

Small work

Unfinished work

I couldn’t do this without your support. Not necessarily monetarily, but spiritually, personally, and energetically. No art is in a vacuum. I suspect that I would do art if it were just me arranging deck chairs on the Titanic, but your company on this journey has made it much more worthwhile.

Thank you!

Thanksgiving: A Pause

Between the cooking of birds and a small blizzard, we’ve had a pause in the world.. Don spent yesterday napping, I believe. I don’t know because I binged watched most of the extended Hobbit with Tolkein, my cat, and started a new sweater. Not what we normally do.

This was not a year for travel. Time and space have not cooperated. But it doesn’t mean that I felt people were distant. How did I manage to make friendships that have lasted 30 years, 40 years? How did that happen?

When we all could travel easier, many of us made friendsgiving, the day after thanksgiving. Now our bodies just aren’t cooperating. But strangely I felt everyone there. Don and I are only kids. We’re both, thankfully considering our parents, orphens. But we have family, rich and strong and very much loved. Thank you all.

Speaking of parents, my father fished as a religion. It was where he found peace, rest, calm and joy. I’ve never wanted to catch a fish in my life, but he took me in his small row boat, and immersed me in that world. Part of me has never left. When I stitch fish, I’m revisiting it. I offer it to you.

I spent the week batching luna moths for my cranes. I’m not sure whether they sit on the coast or not, but they’d be in the adjascent swamp land.

I love batch embroidery. It’s coloring in the zone. I use it for most of the small to medium elements in my quilts. So much can be done with small fish, flowers, frogs, birds, lizards, and anything else you can think of. I always make too many. It’s sort of like too much bacon. How could that happen? And of course, I can always think of a use for another fish or strip of bacon. Many pieces need a left over elements, just to round it out.

Batching elements helps me build a body of things to incorporate into a quilt to make it more love, to make it move, to make it flow.

It may be too much. This is the first pin up. They always shift by the time I get the water in and make adjustments. I think it needs rocks to ground it.

But who wouldn’t follow a path of lunar moths?

Filling in: Designing a Pathway

I’ve been working on this piece for a while. And then I’ve needed to let it sit.

Partially, I was waiting for weed stencils I could turn into rubbing plates. They came from Temu. and took forever. But I’m pleased with them. I want more, higher up on the right side.

Now we come to the tricky part. We have a blank space on the left hand side. You don’t have fish or frogs in surf. Maybe butterflies by the shore. I think rocks would be understated and wrong. What will I use to fill in?

Usually I know my options pretty well. I work a lot with grasslands and swamps, rivers, and ponds. Ocean shores, not so much. I’m not sure what is on the beach except for horseflies. Somehow, that’s not what I wanted.

Google didn’t help either. I looked up coastal insects and got lots of information about pest control. I was hoping for pretty pest control subjects. They did mention some pretty moths.

This is a moment I’m glad I’m a bibiloholic. I have in a series of books, Florida’s Fabulous insects. I have a terrible urge to use a lunar moth I already embroidered. IT worked pretty well. Moving moths could set the path for the eye through the quilt. When I looked it up, luna moths are down there.

So I drew out a series of luna moths. It’s more than this piece needs, but there is no such thing as a luna moth I won’t eventually use.

Design is a process. Solve one part of the puzzle, move to another part. Waiting is also part of the process. I find pieces grow into themselves rather than follow a design I had in mind.

Understanding Quilted Textures: Layering for Stunning Effects

Most quilters think in terms of one surface. You make a top. You quilt a top. It works for the traditional quilt.

It’s never worked for me. If you’re creating a natural world, one layer seems, well, flat. Layers change tones across a piece, build texture, create shading, and add elements that are present but not solid. They can be made from fabric layers, thread layers, and sheer layers.

I also have a layer of image embroidery which is a separate thing.

Hand dye is always my starting layer. Even now when it’s become a pain in the ass to dye, I still don’t want anyone’s fabric for my art but my own. It’s unique one piece to another and if you let it, it will tell you what to do. Who doesn’t need a leg up?

This last month I’ve added another possibility. I can have an oil paint stick rubbing layer that adds substance as well as texture.

Because I can make the rubbing plates I need. I’ve used rubbings for all kinds of things, but mostly, the commercia; plates are best for texture. Oil paint stick rubbing is not exactly transparent, but it does show the background through.

On this piece I wanted trees, water, and reflected trees. I wanted the actual trees to be more present, so I stitched them straight stitch with brown, black and blue.

The reflected trees and the water texture I simply let be. It feels, mirkier, wetter and more like water surface.

I have a beginning layer of sheer shapes for water under my fish.

After I’ve stitched down my fish, the second layer of sheers places them in the water.

A stippled thread layer of Madeiera Metallic colorizes the air portion and makes it shimmer.

A stipple layer of Sliver thread makes the water splash and shine.

Finally a layer of leaves defines the surface of the water.

My goal was to create three worlds, the pond, the surface and the air. I think I’ve got it.

Layers add texture, density and complexity to what I do.

Rubbing Elementals: Using Oil Paint Stick Rubbing to Create Water, Air, Mist and Trees

What are elementals? They’re not the subject or the background. They are layers of sheers usually that create the ilusion of air, water, clouds, fire. Things that are usually translucent or transparent. They change color and texture within the piece without being obtrusive. Usually they have no hard edges. Instead, we see through them, but they help create the illusion of those elements by shifting the colors.

I put in my elementals directly after I’ve chosen my background and finished embroidering my subject.

Up until now, I’ve made my elementals out of sheers, lace, hand painted lace, and dyed cheesecloth. I love those. But I always want more options.

Since I’ve been able to make my own rubbing plates, I’ve had options to create that layered effect. Most rubbing plates create texture or give you a subject. The ones I made with stencils are created to make trees, clouds, waves and waters. Why does rubbed fabric work for that? It has soft edges, It blends into colors, and you can layer your rubbings just like layers of sheers..

I’m very pleased with the background and the fish. But I wanted the feeling of reflected trees and pond surface.

Fish placed in background rubbed with tree images and water reflectons. Rocks added.

The water and the reflected trees add a hazy elemental layer. What now? I’m unsure. I think it needs a layer of sheer waters as well.

Layers suit water. If you’ve ever walked into a pond, you can feel the layers of water, warmer or colder. It makes sense in fabric as well. I’m hoping to create three worlds, the bottom of the pond, the surface of the water, and the bare trees above the surface. Time to get out the silk leaves and organza.

Modeling Paste: All It Needs Is Peppermint Flavor

This is an ongoing series about making rubbing plates, part two.You’ll find part 1, Hunting for Rubbing Plates in last week’s blog. I’ve been exploring making my own rubbing plates with modeling paste and stencils.

Modeling paste costs the earth. And it comes in pretty tiny jars. Not to fear. It turns out to be easy to make with dirt cheap supplies.

I’ve seen several recipes, but none of them seem fussy. People just pour in ingredients and mix them until it’s the right consistency for their work. The peppermint comment is a rememberance to school paste and a joke. PLEASE DON”T EAT THIS STUFF.

Basic Recipe

  • Corn Starch
  • Colored Acrylic Paint
  • White School Glue
  • Container with Lid
  • Spritz bottle with water

Roughly equal parts glue and corn starch. Add a dash of acryllic paste, mix, sprits with water if it’s too thick.

Something no one seems to say is that the cornstarch seems to thicken quickly. It may help to spritz it several times in a session. Covered it will last for 3-4 days.

Colored acrylic paint is a nicety I discovered by accident. I didn’t have white. You can see how your stencil is working if you are working with colored paste. Much recommended.

I’m using foam board as a background. It’s a compromise. Wood is just too heavy and cardboard is to light. I’m using washer weights to hold down the larger pieces from curving as the dry. I cut the foam board into stencil sizes with a boxcutter and a plastic ruler. Foam board can come apart at the edges. I’m using blue masking tape around the edges to hold it together.

Picking Stencils

There is a staggering amount of stencils available. Once you banish the cute puppies and cats, there is an endless amount of choice.

Look for stencils that:

  • Don’t have large empty spaces within the design
  • Have a moderate amount of internal design
  • The right size for the designs you intend. This won’t stretch or shrink in any way.
  • Are made of tough plastic you can reuse
  • Don’t have really tiny lines in them

Making the Rubbing Plate

Set your stencil where you want it. Use a pallet knife to apply the past. A flat scraper or dead credit card is a good tool for smoothing things. Cover your design thouroughly and scrape off all the extra. Lift the stencil off carefully.

I have a bucket of water I put the used stencils in. That makes clean up easier.

You’ll find the design is lightly raised from the surface.

I usually smooth the edges a bit with some sylicon brushes and water.

Let it dry thoroughly.

That’s it. After it dries, you can take a nail file and smooth any rough edges.

Next week I’ll explore what I can do with these plates and some fabric.