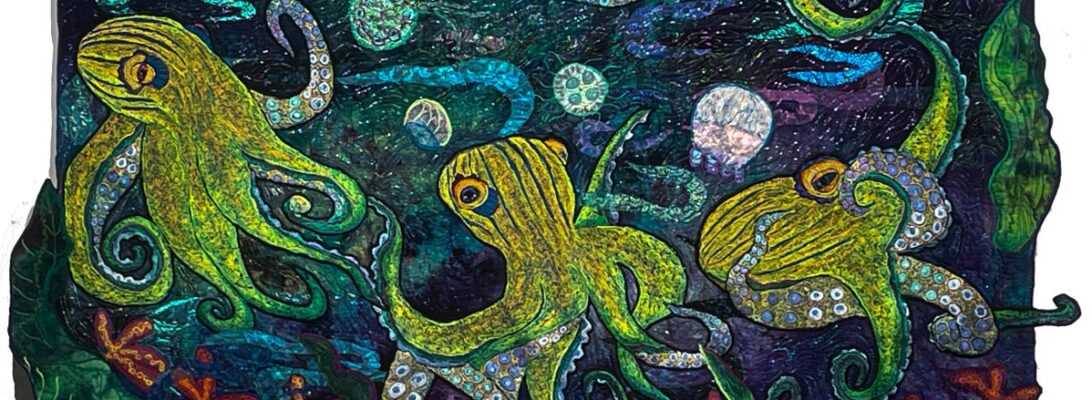
I am happy to announce two events. I have the first couple of showings I’ve had in 10 years.
Open Studio: Quilted Tapestries of Ellen Anne Eddy Saturday, August 27th Quilts, tapestries, books and hand dyed fabrics available for sale!
Hours:- Saturday 9AM – 3 PM Contact: Ellen Anne Eddy219-617-2021Galesburg Art Center, 309-640-0005
Birds of a Feather: Quilted Tapestries by Ellen Anne Eddy Cove Center, Havana, IL
The Cove Center, in Havana, IL announces Birds of a Feather, a show of quilted nature tapestries by Ellen Anne Eddy August 30 through September, 30th 2022. The Cove Center is in the Wahlfeld Building at 120 N. Plum St., downtown Havana Illinois. Hours: Monday – Saturday8 AM – 1PM CLOSED SUNDAYS ~Gallery Opening: September 2nd 4 – 8 PM Contact: Ellen Anne Eddy 219-617-2021Cove Center: 309-640-0005
Splash!
How do I feel about all of this? I haven’t hung a show in ten years. I’m past panicked.
Now, for an artist, panic is your friend. It’s the thing that helps you through the hoop of finishing, binding, hangers, signage and all the little details you remember the night before the opening. Along with raw terror, there’s all that extra energy if you can harness it. By now I’ve run out of steam and Steam a Seam 2 and most of my larger fabric chunks. My friend, Deborah Christman kindly embroidered a Don’t Panic towel In support.
But here’s the cool thing. I have, due to show panic and a small amount of hysteria, 15 new quilts and two new series to show.
So it’s not like I don’t have something to show. Or cool new work for sale. Please come join me! If you can’t make those dates, call and we can make a time for you to see things at the studio. Let me know what you think about the new work. And buy a quilt if you fall in love with one. I’m still out of Steam a Seam.
I know it’s not supposed to be quilter’s fabric. Sorry. I can’t leave it alone. It’s too much fun to play with test tube babies. Over the years I’ve collected a special stash of laces, organzas, chiffons, brocades and just plain weird stuff.
It’s not anything I would piece. But no one would call me a piecer so that’s moot. But it’s wonderful for the things in this world that are, by nature transparent and/or translucent. I’ve talked earlier about finishing sheer edges with a soft edge finish, Sun Rocks, Wind, Water: Elements with Soft Edges.
But there are times you want that edge to show. Edging lace and sheer applique is a way of not only defining the edge of the applique but of controlling the color and controlling exactly how transparent it is.
I’m working on some moonflowers and some snow drops for a quilt called Splash. The quilt features a dark mostly blue background, and I wanted glowing white flowers for the background. Moonflowers are morning glories that bloom only at night. They’re perfect.
It’s also a way of lightening a darker quilt.
I used both lace and organza for my flowers. I do like them to have small differences, so they have their own individuality. Then I placed them with Steam a Seam 2 on a piece of white felt, with some green leaves. Why felt? It’s a spectacular stabilizer, with a layer of Stitch and Tear underneath. Why white? Because it’s all going to show. Whatever color felt I put under the lace will show through and define the color of the finished flowers. Organza will show through the most, lace less so, and Angelina fiber the least.
Knowing that is power. Felt comes in a full Crayola box of colors and it allows me an extra layer of shading in the process. The thread I use will also define the colors and shade things into darks and lights. Here’s a collection of flowers with different backing felt colors.
white over pail blueangelina fiberwhite over pale bluewhite over pinkwhite over whiteWhite on Whitewhite over turquoise
I use a number of pastels as well as different whites to stitch the edges to give depth. As usual, it’s darker where the sun isn’t shining.
shading the flower
I stitched the flowers with a free motion zigzag. Here’s a little video showing how that works.
I did these moonflowers separately from the piece because they’re relatively large and would have distorted the surface. But for the smaller snowdrops, I applied them directly with Steam a Seam ad then stitched on them directly. The cool thing about this is that the background peeks through, like all translucent flowers. It’s a cool effect.
snowdrops directly on the fabric
And it’s a great reason to play with sparkle lace. There should always be a reason for sparkle lace!
We talked earlier about soft edge applique. Soft edge is a minimal treatment that simply covers the edge of an applique with monofilament nylon or poly thread with a zigzag stitch. For things like water, air, fire, rocks, mist, suns and moons it’s perfect. Sometimes it’s good for flower petals as well. It’s for anything that doesn’t need a hard defining edge. It creates soft color shifts across the quilt.
But some things need that edge. Bugs, birds, frogs and fish all need that hard definition. Or you can’t really see them at a distance. And it makes a huge difference when you go to photo your piece.
You know I’m a color girl. I’m going to want to use color every time I can. But over the years I have learned, if you want it to stand out, use the black for an outline.
green outlineblack outline
I particularly have tried it with bugs. Metallic thread green thread always gets my attention, and I reach for it much in the way you might reach for cherry cordial chocolates. But I’m mildly disappointed with it in the end, because it never gives as defined a space.
basic outline
I’ve been working on this egret, and the my process shots reminded me how important that outline is. Again, I’ve been working on doing a dimensional white bird, so it has a lot of contrast underneath to shade to white on the top.
The bare bones outline define the areas to shade with color. I’ve come to rely on 40 weight Madeira Poly neon. It comes in several blacks, but the definitive one is color #1800. I’m using a free motion zigzag stitch to outline, which is why the width is variable. (See post Zigging Upended for a tutorial on zigzag stitch).
I build color, from dark to light from the outline. For more information about choosing those colors, check out this post: Into White: The Search for White Thread Painting. But it’s coloring within the lines. As you can guess, I’m not so good at that. The threads encroach over the line and things get mushy. So the final act is that reoutline.
Redefining the outline
You can see the difference that second outline makes. All the edges that are fuzzed and mussy are now tightened up and out there.
The outside edges will be defined as I stitch the bird down. But having the inner edges cleaned with an extra edge of stitchery redefines all the lines.
finished egret
When I applique the bird on, again I’ll use my zigzag stitch with black thread. It gives the outline definition and punch and helps separate the bird from the background.
This blog is taken from a blog from several years back. Somehow, the pictures got removed, so I’m revising it and putting it up where it’s available. Of all the things I do as an art quilter, I’m very proud that I’m not confined by binding. This lets me make any shape quilt I wish, in any color binding I want.
I started out as a traditional quilter. And for years, I bound all my quilts with bias tape. But as my work became more organic, it felt terribly strange to put my work in a square box. None of my work fits in rectangles. It grows organically. It should be allowed to grow off the edge.
The corded buttonhole is a standard technique from couture sewing, translated from there to the quilt world. It gives us a way to finish both quilts and art clothing in a new way that’s literally out of the box. Instead of the square edges and gentle curves that are the limit of bias binding, we have the freedom to follow any shape. That means that the edge of our pieces is not defined by straight lines, but by their internal design. It also means a quilt can have an external shape that fills a wall in a much more exciting way. giving the negative space around the quilt impact. And because our binding is thread, we have the full range of polyester thread colors for our palette.
I prefer to do this on my Bernina because of the specific feet and the stitch quality. You can use a regular utility foot and a couching foot off another kind of machine.
We’ll be using two basic feet for our binding.
What largely counts is the thread escape on the bottom of the buttonhole foot.
The #1 foot has a top groove we can use to couch down the cord. It’s your standard zigzag pressure foot.
The #3 foot has a thread escape groove on the bottom for the zigzag stitching to pass through. The #3 foot is the older style buttonhole foot (without the electronic eye)that has exactly the right thread escape to accommodate the buttonhole binding.
No matter where I put the couching thread, it lands on the floor while I’m stitching. If you have floors like mine, a yarn bowl will help keep your crochet cotton clean. The thread will spool evenly as you’re couching.
You’ll need
#3 Crochet cotton
A quilt/ or quilted object backed, quilted and ready to bind
Polyester #30-40 weight embroidery thread the color of your choice
A#3 foot and a #1 foot, or a regular presser foot and a couching foot
A zigzag sewing machine
A rotary cutter and mat
A yarn bowl
Binding
We’ll bind our piece with a corded binding that’s basically a corded buttonhole all around the edge.
Preparing your quilt:
Stitch around the edge either with monofilament nylon or with a neutral embroidery thread so that all the layers are together
Your piece doesn’t have to be rectangular or square. It can be any shape at all. To keep sharp 45-degree corners or points, you need to clip the tips off them.
Using your rotary cutter, cleanly cut away all the extra bat and backing fabric, exactly the shape you want your quilt to be. You want all the edges to be clean. You will lose around a quarter inch in the binding.
Thread your machine top and bottom with a polyester embroidery thread of your choice. You can use rayon or metallic thread, but the breakage tends to make things so much more difficult. I prefer Madiera Polyneon and Isacord.
Attaching the cord:
Set your machine on a zigzag stitch, with the needle position one position over from full left. Your stitch length should be set at almost the widest width.
Position your quilt so the stitch falls just over the right-hand edge of your quilt. Thread the crochet cotton through the top of the foot.
Start your stitching somewhere in the lower edge, not on a corner or direct curve.
Zigzag your cording all around the edge.
When you come to the end, drop your feed dogs and make several stitches to anchor the cord.
Clip your threads and cord.
Tip: If you have a quilt that is ruffling at the edge just a bit, you can pull the cord and gather in the ruffle. This will not solve severe distortion problems, but it will fix minor ones. You need to pull the cord before you change directions or turn a corner.
Corners, curves and points:
These all take a bit of finesse. Your standard buttonhole stitch isn’t set up to cover them. But you can get good coverage on them by rocking your stitch over them. As you’re stitching, you can pull back just a bit from the front to make sure your stitch line covers everything. Curves may also need that assistance. For corners and particularly for points, stitch up to them and turn the piece at slightly different angles as you go round the edge. You can put the needle down within the point and pivot and stitch several times until you have coverage.
Covering the cord:
Your second pass should cover your cord with smooth zigzag stitching. Flip your piece over and start on a straight section.
You’ll find certain areas may not have been included in the stitching. This will give you a chance to address that.
Set your sewing machine for the widest stitch it will give, and the densest stitch length it can handle. Put your needle position to the far left.
Use your #3 foot, with the double channel thread escape.
Position your quilt so that the stitch to the right ends over the edge of your quilt
Start at a lower edge, not on a corner or a curve.
Stitch around the edge of your quilt.
When you come to the beginning, move your needle position to the far left, set it onto a straight stitch, and stitch in place to anchor the stitching.
Sometimes I get enough coverage on the second pass, but that’s rare. Usually, it takes a third time around. Turn the piece over. If you still have wisps sticking up through the binding, trim them as best you can, and go around another time. I’ve been known to do four passes to get a smooth, solid cord. Turn your piece over each time to get better coverage.
Your color choice defines the edge of the quilt. If you match the center of your quilt, it will have no visual border. The piece appears to drift off the edge. If you contrast it strongly, it stops right at the edge. If you pick a color that softly blends in with the piece, the edge is visual, but softer, blending the edges into the wall. There is no right or wrong. Just the result you want for that piece.
Tips:
A clean-cut edge to your piece is always easier to cover with stitching. Use your rotary cutter and make a nice, solid cut line. Trim curves with sharp scissors.
Use a new topstitching #90 needle for the best stitch and for less thread breakage.
Apply Sewers Aid to the thread to help with thread breakage.
Organic quilts don’t have to be stuck in a box. A corded buttonhole binding lets your quilt go over the edge.